How To Add Code Box Area In Blogger Posts
It is good to have a code box area in your blogger posts if your blog is about blogger tutorials, blogger widgets, blogger templates or it deals with any kind of blog customization. It will become easy for anybody to locate the html code and easily copy and paste the code for using it. It will also give a well organised look to your blog posts. Just read and follow all the steps given below to get this function in your blogger blog for each post.
Step1: Log in to your blogger account. Go to Dashboard >> Template.
Step2: Click on the Customize.
Step3: GO to Advanced >> Add CSS.
Step4: Copy and Paste the following code in the Add CSS section.
Step5: Now whenever you are composing new post , just select HTML section and paste the following code.
<div class="code">
Paste your code
</div>
Step6: Go to Compose mode. Replace Paste your code with your code. Complete your post and publish it.
Step1: Log in to your blogger account. Go to Dashboard >> Template.
Step2: Click on the Customize.
Step3: GO to Advanced >> Add CSS.
Step4: Copy and Paste the following code in the Add CSS section.
.code { background:#f5f8fa; background-repeat:no-repeat; border: solid #5C7B90; border-width: 1px 1px 1px 20px; color: #000000; font: 13px 'Courier New', Courier, monospace; line-height: 16px; margin: 10px 0 10px 10px; max-height: 200px; min-height: 16px; overflow: auto; padding: 28px 10px 10px; width: 90%; } .code:hover { background-repeat:no-repeat; }
Step5: Now whenever you are composing new post , just select HTML section and paste the following code.
<div class="code">
Paste your code
</div>
Step6: Go to Compose mode. Replace Paste your code with your code. Complete your post and publish it.

Recent Comments Widget With Avatars
Today I am sharing an script for Recent Comments With Avatars that you can also use as a widget in your blog sidebar or footer. The main feature of this widget is the avatars of commentors. Look of the widget is cool and awesome. Check out the screenshot of the Recent Comments widget With Avatars that I am using in this Blogger blog.

Isn't it awesome???
1) Login in to your blogger account and go to your blogger Dashboard.
2) Go to layout secton and click on Add Gadget option where you want to show the widget.
3) Select the HTML/Javascript option.
4) Give a title name to your widget and add the following code in the content field.
You can change the values like number of comments, size of the avatar image, number of characters.
Replace yourblog with the name of your blog
5) Click Save and refresh your blog. Its all done.
Isn't it awesome???
Procedure to get Recent Comments Widget With Avatars in your blog
1) Login in to your blogger account and go to your blogger Dashboard.
2) Go to layout secton and click on Add Gadget option where you want to show the widget.
3) Select the HTML/Javascript option.
4) Give a title name to your widget and add the following code in the content field.
<style type="text/css"> ul.w2b_recent_comments { list-style: none; margin: 0; padding: 0; } .w2b_recent_comments li { background: none !important; margin: 0 0 6px !important; padding: 0 0 6px 0 !important; display: block; clear: both; overflow: hidden; list-style: none; } .w2b_recent_comments li .avatarImage { padding: 3px; background: #fefefe; -webkit-box-shadow: 0 1px 1px #ccc; -moz-box-shadow: 0 1px 1px #ccc; box-shadow: 0 1px 1px #ccc; float: left; margin: 0 6px 0 0; position: relative; overflow: hidden; } .avatarRound { -webkit-border-radius: 100px; -moz-border-radius: 100px; border-radius: 100px; } .w2b_recent_comments li img { padding: 0px; position: relative; overflow: hidden; display: block; } .w2b_recent_comments li span { margin-top: 4px; color: #666; display: block; font-size: 12px; font-style: italic; line-height: 1.4; } </style> <script type="text/javascript"> //<![CDATA[ // Recent Comments Settings var numComments = 3, showAvatar = true, avatarSize = 40, roundAvatar = true, characters = 40, showMorelink = false, moreLinktext = "More »", defaultAvatar = "http://www.gravatar.com/avatar/?d=mm", hideCredits = true; //]]> </script> <script type="text/javascript" src="http://helplogger.googlecode.com/svn/trunk/w2b recent comments with avatars.js"></script> <script type="text/javascript" src="http://yourblog.blogspot.com/feeds/comments/default?alt=json&callback=w2b_recent_comments&max-results=5"></script>
You can change the values like number of comments, size of the avatar image, number of characters.
Replace yourblog with the name of your blog
5) Click Save and refresh your blog. Its all done.
How To Get More Traffics To Your Blog
Every blogger wants more and more visitors to their blogs. Only excellent writing would not draw you mass visitors to your blog. You need to promote your blog too to get more traffics to your blog. Also it depends a lot on your blog outlook and design. But above all the blog content is the main factor that will draw you large traffics to your blog. Earlier I discussed about this topic and wrote about some ways to promote your blog. To read my previous writing about ways of promoting blog for more traffics, go to the link -
5 Ways Of Promoting Your Blog For More Traffics
Today I am adding few more points here in this post. Follow these points intelligently and you would definitely gonna experience increase in number of hits to your blog.
Choose keywords in your article very wisely. Keywords in your article matters a lot in SEO. Use any SEO keyword research tool.
Adding your blog URL as email signature is very intelligent idea.
Don't try to make your blog design too complicated. This may lead your visitors getting confused and they will never ever visit your blog again.
You should always focus on writing quality content. Always Keep in your mind that "Content is the King".
5 Ways Of Promoting Your Blog For More Traffics
Today I am adding few more points here in this post. Follow these points intelligently and you would definitely gonna experience increase in number of hits to your blog.
1) Choose Your Words Wisely (SEO)
Choose keywords in your article very wisely. Keywords in your article matters a lot in SEO. Use any SEO keyword research tool.
2) Put your blog URL in your email signature
Adding your blog URL as email signature is very intelligent idea.
3) Keep your blog Simple and Eye-catching.
Don't try to make your blog design too complicated. This may lead your visitors getting confused and they will never ever visit your blog again.
4) Write quality content
You should always focus on writing quality content. Always Keep in your mind that "Content is the King".
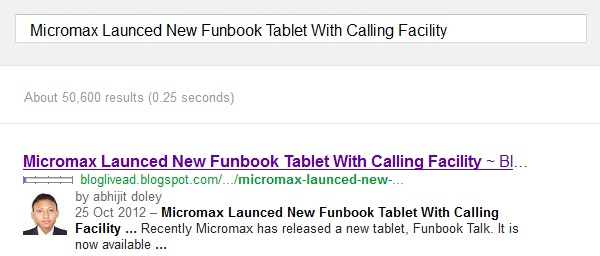
How To Display Your Profile Picture In Google Search Results
Do you know you can display your image next to the links of your website or blog on search results page? Earlier this feature was only limited to few reserved users of Google. Now everyone who owns blog or website can use this feature. The main advantage of using this feature is that more visitors will be attracted to your pages and there will be a big rise in click ratio of your pages as visitors will prefer your blog.
You will need :-
A Google Plus Account
An About Me page on your blog.
Now you can follow the steps given below :-
1) On your blog or website header or footer or sidebar add this link,
<a href="https://plus.google.com/GOOGLE+ ID"
rel="author" target="_blank"> Join me on Google+</a>
Replace GOOGLE+ ID with your Google+ profile id.
2) In your About Me page, add the link given below anywhere you want,
<a href="https://plus.google.com/GOOGLE+ ID"
rel="me" target="_blank"> My Google Profile</a>
Replace GOOGLE+ ID with your Google+ profile id.
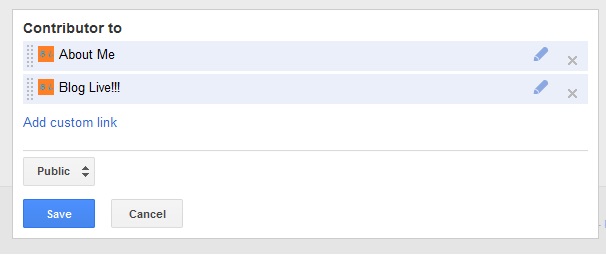
3) Go to your Google+ profile and click the “Edit Profile” button
Go to About tab and click on 'Contributer to' field.
Add your Blog/site homepage URL and also the URL of your About page.
4) Go to http://profiles.google.com/me/plusones.
Click Edit Profile.
Check the Show this tab on my profile checkbox.
Next Upload a quality Profile Pic of your self . Your image will look best if it is 150px by 150px in size.
Finally Save your profile.
It will take few days (around 2-5 days) to show up your photo and name next to the links of your website or blog on search results.
You will need :-
A Google Plus Account
An About Me page on your blog.
Now you can follow the steps given below :-
1) On your blog or website header or footer or sidebar add this link,
<a href="https://plus.google.com/GOOGLE+ ID"
rel="author" target="_blank"> Join me on Google+</a>
Replace GOOGLE+ ID with your Google+ profile id.
2) In your About Me page, add the link given below anywhere you want,
<a href="https://plus.google.com/GOOGLE+ ID"
rel="me" target="_blank"> My Google Profile</a>
Replace GOOGLE+ ID with your Google+ profile id.
3) Go to your Google+ profile and click the “Edit Profile” button
Go to About tab and click on 'Contributer to' field.
Add your Blog/site homepage URL and also the URL of your About page.
4) Go to http://profiles.google.com/me/plusones.
Click Edit Profile.
Check the Show this tab on my profile checkbox.
Next Upload a quality Profile Pic of your self . Your image will look best if it is 150px by 150px in size.
Finally Save your profile.
It will take few days (around 2-5 days) to show up your photo and name next to the links of your website or blog on search results.
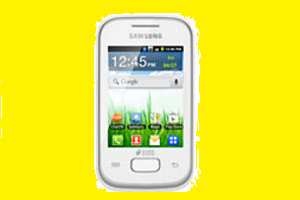
How To Connect Samsung Galaxy Phones With PC As Modem To Surf Internet From PC
One of my friend was facing problem in connecting his newly bought Samsung Galaxy Phone with his computer for using Internet in his computer. Well I guess many of you are facing the same situation. As Samsung Galaxy phones are Android phones so your Samsung Galaxy phone will not be connected via Samsung New PC Studio software. So I am here to give you the right solution to your problem. Read this tutorial and follow all the steps given to connect your Samsung Galaxy phone easily with your computer and surf internet.
1. First of all plug in your Samsung Galaxy phone to PC via USB cable and do not select the file transfer mode.
2. Go to menu >> settings >> wireless and network >> mobile network.
And check "Use packet data"
3. Now Go to menu >> settings >> wireless and network >> Tethering and Portable Hotspot.
And check "USB Tethering"
4. Install Kies on your PC, Download Link Of Kies
5. Now in PC, go to Control Panel >> Network and Internet connections >> Network connections
Here you will see Samsung modem.
Now you can connect.
Ok, if your problem is solved then like the post or give your feedback in comment box.
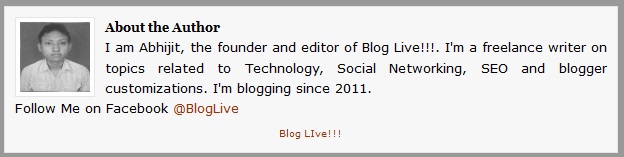
How To Add About The Author Box Below Blog Post In Blogger
You have seen About the author box below blog posts in many Wordpress blogs. But in Blogger there is no such feature enabled. Dont worry Blogger guys, you can still include that same feature in blogger by adding some codes. Its a simple process. Read the instructions given below and follow them to get a new professional look in your blog.
Just look at my About the author box given below:
STEPS:-
1--> Login to your Blogger Account.
2--> Go to Blogger Admin Page > Template > Click on Edit HTML.
3--> Click Expand Widgets
4--> Search for codes given below
]]></b:skin>
Just above it paste the following codes given below
.author-box {
background: #F7F7F7;
margin: 20px 0 40px 0;
padding: 10px;
border: 1px solid #E6E6E6;
overflow: auto;
}
.author-box p {
margin: 0;
padding: 0;
}
.author-box img {
background: #FFFFFF;
float: left;
margin: 0 10px 0 0;
padding: 4px;
border: 1px solid #E6E6E6;
}
This is the CSS part
5--> Search for codes given below
<div class='post-footer-line post-footer-line-1'/>
Just below it paste the codes given below:
<b:if cond='data:blog.pageType == "item"'>
<div class='author-box'>
<p><img alt='' class='avatar avatar-70 photo' height='70' src='Your Photo Link' width='70'/><b>About the Author</b><br/>
<div style='text-align: justify; font-family: verdana; color: rgb(0, 0, 0);'>Write Something About yourself<br/>
Follow Me on Twitter <a href=' Your Twitter Link '>Your Twitter link Anchor text</a>
<p style='margin:-8px 0'><br/><center>
<a href=' Your Blog link ' style='text-decoration:none;font-size:70%;'>Your Blog Name</a></center>
</p></div></p>
</div>
</b:if>
Change the following things as you wish them to be displayed
Your Photo Link
About the Author text
Write Something About yourself
Your Twitter Link
Your Twitter link Anchor text
Your Blog Link
Your Blog Name
6--> Save template and done :)
Feel the new look of your Blogger blog.
Creating Sitemap Page In Your Blogger Blog
You need to submit your sitemap to popular search engines to make your blog pages index by them. Sitemap page in a blog helps the visitors to track the contents of that blog. You have seen sitemap pages in many blogs. Have you thought of creating a sitemap page in blogger blog? Yeah it is possible.This tutorial will help you in creating a sitemap page in your blogger blog.
Steps To Create A Sitemap Page In Your Blogger Blog:-
1) Go to Edit HTML section of your blogger dashboard. Check Expand Template Widget.
2) Ctrl + F and search </head>
3) Paste the following codes above </head>
<script>
var numposts = 100;
var showpostdate = false;
var showpostsummary = false;
var numchars = 200;
</script>
<script>
function rp(json) {
document.write('<ul>');
for (var i = 0; i < numposts; i++) {
document.write('<li>');
var entry = json.feed.entry[i];
var posttitle = entry.title.$t;
var posturl;
if (i == json.feed.entry.length) break;
for (var k = 0; k < entry.link.length; k++) {
if (entry.link[k].rel == 'alternate') {
posturl = entry.link[k].href;
break;
}
}
posttitle = posttitle.link(posturl);
var readmorelink = "(more)";
readmorelink = readmorelink.link(posturl);
var postdate = entry.published.$t;
var cdyear = postdate.substring(0,4);
var cdmonth = postdate.substring(5,7);
var cdday = postdate.substring(8,10);
var monthnames = new Array();
monthnames[1] = "Jan";
monthnames[2] = "Feb";
monthnames[3] = "Mar";
monthnames[4] = "Apr";
monthnames[5] = "May";
monthnames[6] = "Jun";
monthnames[7] = "Jul";
monthnames[8] = "Aug";
monthnames[9] = "Sep";
monthnames[10] = "Oct";
monthnames[11] = "Nov";
monthnames[12] = "Dec";
if ("content" in entry) {
var postcontent = entry.content.$t;
} else if ("summary" in entry) {
var postcontent = entry.summary.$t;
} else
var postcontent = "";
var re = /<S[^>]*>/g;
postcontent = postcontent.replace(re, "");
document.write(posttitle);
if (showpostdate == true) document.write(' - ' + monthnames[parseInt(cdmonth,10)] + ' ' + cdday);
if (showpostsummary == true) {
if (postcontent.length < numchars) {
document.write(postcontent);
} else {
postcontent = postcontent.substring(0, numchars);
var quoteEnd = postcontent.lastIndexOf(" ");
postcontent = postcontent.substring(0,quoteEnd);
document.write(postcontent + '...' + readmorelink);
}
}
document.write('</li>');
}
document.write('</ul>');
}
</script>
4) Save the template.
5) Now create a new page.
Give a title to the page (sitemap or anything)
Select HTML section and paste the following script.
<script src="http://www.BlogName.com/feeds/posts/default?orderby=published&alt=json-in-script&callback=rp"></script>
Replace the red section with your domain.
Publish it.
Now you got the sitemap page in your blogger blog.
Subscribe to:
Posts (Atom)